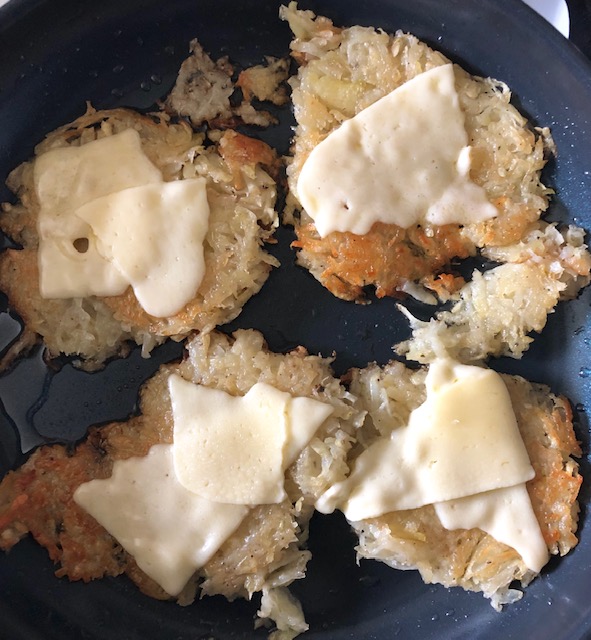
When I was younger I used to love those already made hash browns from the grocery store. You know, the ones where you would just pop in the microwave for a couple of seconds, drench in ketchup and eat. I used to really love how it tasted, until I made homemade hash browns. That was the last time I bought pre-made hash browns!
Homemade hash browns take a bit more time than just popping them into the microwave, but once you have a taste, I think you will agree with me when I say, you will never look at any other hash browns the same way again! It took me a while to cook it correctly, and I made plenty of mistakes. However, I am excited to share a few tricks I learned along the way.
Are Homemade Hash Browns Better?
At this point you might be thinking I am crazy. Store bought hash browns are good. Why is she even wasting her time?! Well, aside from the delicious factor, one time I did read the ingredients in the store bought version, and oh my goodness, it’s a paragraph long! I was definitely not keen on all those preservatives and extra ingredients in there that really, reallyy didn’t need to be there! I won’t even get into how long those potatoes have been sitting in the freezer (who knows right?!)
So, if you one day decide that you want hash browns without those extra ingredients, make these! Not only will you save money, you will also be putting a healthier option on your plate (and can pronounce all the ingredients that go in it).
Tips for Perfectly Crispy Potatoes
One thing I’ve learned (through a few trial-and-error batches!) is that the secret to crispy, golden potatoes comes down to just a few key details. Don’t be intimidated by the steps — once you try it, you’ll see how fun and rewarding the process can be. Here are my go-to tips to help you get it right every time:
1. Use plenty of olive oil.
Don’t be shy with the oil! Potatoes have a natural tendency to stick to the pan, and a generous drizzle not only prevents that but also gives you that irresistible crispy edge.
2. Remove excess moisture.
After grating the potatoes, squeeze out and discard the natural juices. Too much liquid can make your potatoes soggy instead of crisp, so this step is totally worth it.
3. Pick the right potato.
While you can use golden potatoes, I personally prefer russets. They create a crispier, lighter texture, whereas golden potatoes tend to turn out a bit creamier and slightly sticky.
4. Don’t stress about perfection.
If your first batch doesn’t turn out exactly how you hoped, don’t worry — mine didn’t either! Each time you make them, you’ll get better at balancing the heat, oil, and timing.
5. Stay safe with hot oil.
When frying, be careful around the stove and keep kids at a safe distance. A little caution goes a long way.
These small steps make a big difference, and honestly, it’s a great recipe to make on a weekend with family or friends. Once you master your own method, crispy potato mornings will quickly become a favorite ritual!
| Prep time: 20 minutes | Bake Time: 40 minutes |
| Serves: 12 slices | Total time: 1 hour |
| Ingredients 4 medium russet potatoes (peeled) 1 tsp salt 1/4 tsp black pepper 1 tsp garlic powder 3+ tbsp extra virgin olive oil *Optional 2 slices of havarti cheese broken in half, or your favorite cheese. |


| Instructions 1. Wash, peel, and grate all the russet potatoes and place into a medium bowl. (I use a grater like this one) (I then use the third largest size which is about the same size as shredded mozzarella cheese would be) 2. Add salt, black pepper, and garlic powder and stir until well combined. 3. On a large frying pan, add about 2 tbsp olive oil and turn heat on medium. (*Tip, you want a thin layer to cover the surface area of your entire pan, this will vary depending on your pan, so add 1 more tbsp if 2 is not enough.) 4. Grab a chunk (about 1/2 cup) of the grated potatoes with your hands and squeeze the excess juices onto another bowl (to discard later). Flatten the potatoes with the palms of your hands to make it look like a large patty. 5. Carefully transfer to the pan. Gently scoop the grated potatoes onto a spatula. Because the potatoes still contain some moisture, the hot oil may sizzle or splatter when they hit the pan—so take your time and stay cautious. Slowly place the potatoes into your preheated frying pan. Be extra careful here and protect your face and hands from any splattering oil. Once all your hash browns are in the pan, use the spatula to gently flatten them into even patties. To minimize splatter, you can partially cover the pan with a splatter guard or lid—it’s a real lifesaver! Just remember to leave a little space for steam to escape and continue to use caution around the hot oil. 6. Repeat this step 3 more times, or until you run out of your grated potatoes. Place each hash brown side by side (*see picture) and let them cook about 4-5 minutes on each side (or until golden brown). 7. Once you flip your patties, place your favorite type of shredded or sliced cheese one minute before the hash browns will be done cooking and let it melt a little. 8. Remove from heat and place onto a plate lined with a paper towel (to remove any excess grease). *Notes Keep on eye during the 4-5 minutes your hash browns are cooking on each side. After about 2 minutes, you can gently scrape the hash brown with a spatula (as if you’re going to flip it) and place it back down on the same side, just so it doesn’t stick. (I use this pan, so I have to follow this step). If you’re using a nonstick pan, you could skip this step. Another way to get the moisture out of the potatoes is to use a large cheesecloth like this one and place the all of the grated potatoes in there and squeeze the juices out. |
You will also love
*Disclosure
If you end up liking and purchasing any of the products through my links. I may receive some compensation. I am so grateful for your support.
Leave a Reply